Showing posts with label Recipes. Show all posts

Wednesday, April 04, 2012

Easter (sort of) Cinnamon Buns... by Barbara (Ruth)

Forgive me dear readers, for I have sinned. It has been 5 weeks since my last blog posting! My blogging partner (Angela) Jean and I were out last night talking about our blog (which, by the by, celebrated its one year blogiversary on March 6th), and about how we have been remiss in our regular postings lately. (Angela) Jean has a great excuse in the form of a horrible 3 week flu followed by a family vacation. I, however, have no excuse. In the absence of her posts I simply forgot! I have been quite taken up with my new business, Whiteboard Consulting, but that's no excuse.

Anyhoo, I'm back.

Last year at this time I made hot cross buns and posted (here) about why they are part of my Eastertide celebrations. I thought that today I would write about another sweetbread that my Mother often made around the same time. (To be honest, she made them all year round, but baking seemed a great way to get me back into the blogging frame of mind.)

I have a recipe that is so special it's written down in several places - all on scraps of paper covered in drips of oil and egg. The recipe is simply "Muzzer Rolls" (as a kid we called my mother Muzzer), and is incredibly easy and tasty. She used to make them to go with "Muzzer Soup" (also written on scraps of paper) to feed the hungry teenagers on school nights. I've made them for dinner parties and usually there are no leftovers!

One of the variations is to turn "Muzzer Rolls" into cinnamon buns, and that's what I did today. I'm headed to a friend's family cottage north of Kingston, Ontario tomorrow, and the cinnamon buns are part of my contribution to the Easter treats. Baking them was almost as much a treat for me, as I think of my Mother every single time I make these. Also, the house smelled terrific!

I hope you enjoy these. They aren't at all healthy, but man they are delicious!
Ready to go in the oven...

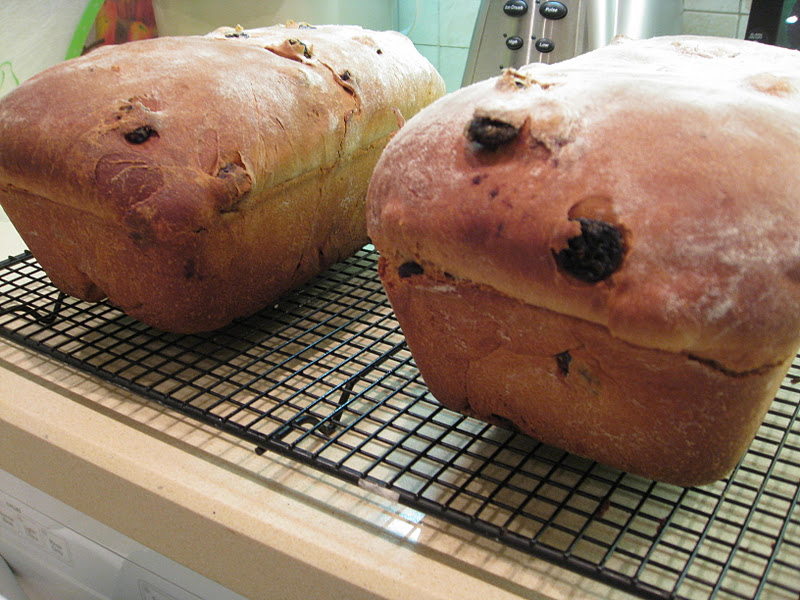
Fresh out of the oven...

Turned out, gooey, warm, and delicious!


Muzzer Cinnamon Rolls

  1. In a mixing bowl, stir together 1C warm (not hot) water, 1 tablespoon yeast, 1 teaspoon salt, 1/4 cup white sugar, and let it bubble.
  2. In a separate bowl, whisk together 1/4 cup warm water, 1/4 cup canola oil, and an egg.
  3. Once the yeast mixture has bubbled, stir in the egg mixture. 
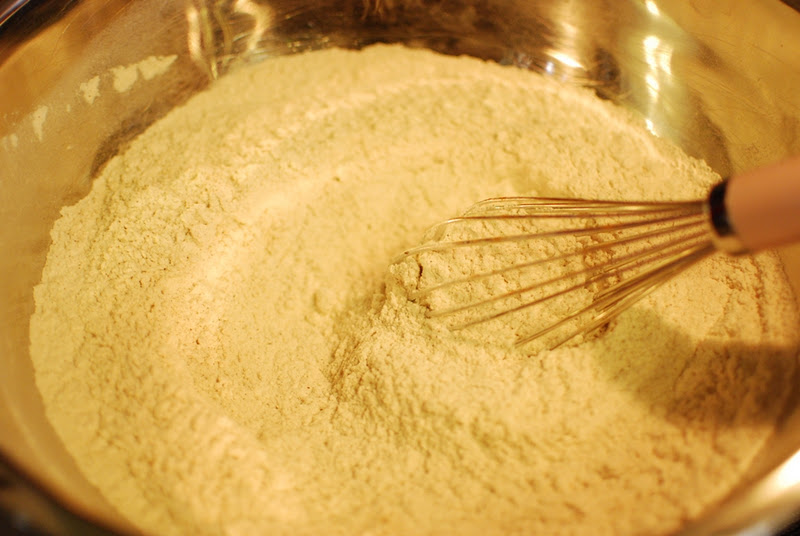
  4. Using the dough hook attachment, stir in about 4 cups of white flour, and allow the dough hook to mix thoroughly (about 10 minutes on slow). The dough should be sticky but not wet.
  5. Turn dough out onto floured countertop, and knead by hand for 5 minutes or so, until the dough is smooth. 
  6. Shape into a ball and place back into the bowl. Cover with a dishtowel and let rise until double, about 90 minutes.
  7. Melt a stick of butter, and pour half into a 9x13 baking pan. (I use a glass pan so I can tell if the sides and bottom of the bread is done before taking it out of the oven.)
  8. Use your finger to grease the sides, bottom, and corners of the pan. There should be lots of butter left in the bottom of the pan.
  9. Pour a healthy amount of corn syrup over the bottom of the pan. I can't tell you how much - just drizzle it all over. It depends on your sweet tooth, I guess.
  10. Put the dough back on the shelf and punch it down, then knead for a few minutes. Use a rolling pin to roll it out into a rectangle, about 12 inches wide, and about 1/4" thick.
  11. Use a pastry brush to spread melted butter all over the dough. Pour any remaining butter into the pan.
  12. Sprinkle brown sugar, raisins, and cinnamon over the buttered dough. Again, I can't tell you how much - it depends on your taste. The more the better, in my opinion.
  13. Start at a long edge of the dough and roll it up into a long cylinder shape. Using a serrated knife, cut into 12 equal pieces, and place into the pan.
  14. Cover with a dishtowel and let rise for about an hour.
  15. Bake at 350F for about 15 minutes. 
  16. Check the rolls and if the tops are browning quickly, cover with tin foil.
  17. Bake another 5-10 minutes, checking to see if the sides are cooked.
  18. Turn out onto a cooling rack covered with tin foil.
  19. Best served warm, but also terrific heated up the next day!

Monday, January 23, 2012

Comfort Food for January... by Barbara (Ruth)

This posting is in honour of a number of my friends and family who had a rotten day today. I wish I could have them all over for dinner in my cozy house, because tonight I'm serving comfort food with a twist.

There are so many good reasons for comfort food in the wintery greyness of January: it's cold, it's dark, it's rainy and/or snowy, there are pot holes everywhere, cold and flu viruses run amok (GW) at work and/or at daycare, it's tax season, the stock market is nutters, commuting sucks out your soul, or you just had a rotten day.

(I should say that I can list an equal if not larger number of things that are awesome about winter, but that's another post entirely.)

The thing about comfort food is that it usually involves serious caloric intake: macaroni and cheese, meatloaf, beef stew, grilled cheese, shepherd's pie, and lasagne, for example. And in January most of us are trying hard to "be good" and get back to healthy eating habits after the gluttonous sins of December.

And so I bring to you my January-friendly Comfort Food. Delicious, nutritious, and sure to make you feel warm, cozy, and wrapped up in a big hug.

The Menu
  • Real Cream of Tomato Soup
  • Sesame Grain Bread

Total calories for this meal? 315. It also has 10g of protein and 6g of fibre, not to mention Vit A, Vit C, calcium, and iron. And it is REALLY good. 

With that kind of low calorie count you can add some butter (although fresh bread doesn't need it), or a nice piece of cheese. I'd say you should add a green salad, but that goes against the principle of comfort food, really. As for dessert? Well, there you're on your own - I think that dessert-y comfort food can not and should not be healthy.

Whether or not you had a rotten day and are in need of some healthy comfort food, I hope you enjoy these two recipes. They are guaranteed to be heart-warming, and heart-healthy.

Real Cream of Tomato Soup

This recipe comes from "50 Simple Soups for the Slow Cooker". I'm experimenting with my slow cooker more and more these days, as I find I'm inspired to cook early in the day, and not so much in the evening. It's important to practice, because slow cooker meals can end up mushy and resembling dog food, but if you pay strict attention to the directions then it can be a real life save at dinner time.

This recipe is ridiculously easy. 

 
  1. Put 2 to 3 lbs of tomatoes (quartered) in the slow cooker, along with a half a chopped sweet onion (like Vidalia), and 2 or 3 cloves of garlic. 
  2. Cook on low for 4 hours until the tomatoes are soft and falling apart.
  3. Using a handheld immersion blender, puree the mixture until the desired texture is achieved, Stir in one cup of cream (I used milk) and add salt to taste. You can also add chile flakes for some kick.
  4. Garnish with fresh basil leaves or fresh ground pepper.
Sesame Grain Bread

If you're a regular reader then you know I love to make bread. I've posted about it here and here. More often than not I turn to the book "Great Breads", by Martha Rose Shulman, and I always have success. The recipe is pretty straightforward, and slightly adapted to my own bread-making methods which are not quite as picky as Martha Rose Shulman's (in other words, I don't do everything by hand, I use my KitchenAid mixer with the dough hook).

When I made this one today I was out of sesame seeds, so I used flax seeds - just as delish! Each slice has about 262 calories (based on cutting each loaf into 10 slices). It's very dense and very hearty, and chock full of nutrients.

  1. In the mixing bowl, combine 1 T yeast, 3 C lukewarm water, 2 T honey, 2 T molasses, 2 C white flour, and 2 C whole wheat flour.
  2. Blend using mixing paddle, cover with a tea towel and set in a warm place to bubble (about an hour).
  3. Using mixing paddle, add in 1/4 C canola oil, 3/4 C sesame seeds (which you should either pound with a mortar and pestle, or do what I did and pop them in the blender for a few seconds - not too long), 1 T salt, 3/4 C rolled oats, and 1 C cornmeal.
  4. Switch to the dough hook and add 2-2 1/2 C whole wheat flour, and let the dough hook do it's thing until the dough forms a ball and is slightly tacky to the touch.
  5. Turn out on to lightly floured surface and knead for about 5 mins until the dough softens. Form a ball and return to the mixing bowl. Cover with the tea towel, and set aside to allow it to rise double in size.
  6. Turn out onto the floured surface again and divide the dough into two. Knead each part for several minutes and shape into loaves.
  7. Put loaves into oiled loaf pans (I spray with Pam, and I use glass pans so I can see whether the bottoms are cooked), cover with tea towel, and let rise one last time.
  8. When the loaves have risen above the edges of the pan and look like bread, pop into a 350F oven for 40 mins.
  9. At 40 mins, check the bread - if the tops are browning too much, cover loosely with tinfoil.
  10. Leave in the oven for another 10 mins. Loaves are done when they sound hollow.
  11. Turn out and cool on racks.

Thursday, January 12, 2012

James' Fancy Buns......a guest post

Barabara Jean is happy to introduce James, our guest blogger for today. James has been my dear friend for just about 20 years. We met at University; my first year, his last. He is a talented musician, an excellent cook, and a wonderful, generous person with a dry, witty (and at times 'off colour') sense of humour. I hope you enjoy this post about Fancy Buns.

My dear old friend (Angela) Jean - soprano, mother, and a great person to have a lunch-hour bitch-fest with, asked me a while back if I would do a guest blog for her. I had no idea what to write about and she suggested I do something with one of my 'fancy breads'. I never thought there was anything 'fancy' about a bit of flour, water, yeast, and some salt, until I realized that my 'fancy' bread also had sugar, butter, and eggs in it. I might as well have deep-sixed the temperamental yeast (which I have routinely killed over the years), and just made some cookies.
Before I cook or bake anything I always have my mise-en-place ready to go. If I'm making red gravy, I'll have all my aromatics chopped, my salt pig and pepper mill nearby, and my San Marzanos crushed and waiting. For baking, I have everything pre-measured and in bowls so I can just do the cooking show thing and dump ingredients in as I need them. Rachael Ray can eat her heart out. (I bet it would taste cloyingly sweet and cheap.)

 Ingredients:

3 cups unbleached AP flour
2 1/4 teaspoons instant yeast (1 envelope if you don't buy in bulk)
1/4 cup white sugar
1 1/4 teaspoons salt

2 large eggs plus one yolk (reserve the white for the egg wash)
4 tablespoons (1/2 stick) unsalted butter, melted
1/2 cup water at room temperature

poppy or sesame seeds

I start by whisking the dry ingredients together in a medium bowl. Mix the eggs, butter and water together in the bowl of a standing mixer. If you don't have a standing mixer you should get one, but the dough may be made by hand. Just mix everything (liquids, then dry), in a large bowl with a wooden spoon until the ingredients come together. It can then be kneaded by hand on a floured surface. My mother made this by hand as she doesn't have a mixer, but then again, the last time I visited my parents they made me sleep on the hardwood floor of a room filled with boxes. They don't believe in luxury items like stand mixers and beds.

Add the flour mixture and mix at low speed with your dough hook until a ball forms, about five minutes (longer if kneading by hand). Add extra flour one tablespoon at a time if the dough seems too sticky. Form the dough into a ball and roll it in a lightly-oiled bowl. Hopefully your ball will be less lumpy-looking than mine.

Cover with plastic and let rise in a warm place until doubled in bulk - 1 1/2 - 2 hours. I like to take advantage of the fabulous bottom-mounted lights in my kitchen to keep my dough warm.
For several years I have been using a depilatory crème on the top of my head so that people think I am bald. I made good use of this rising time by giving myself an acid-based scalp wash to keep up my smooth look but I was very careful not to drip any Veet in the dough. Since I also decided not to cook dinner tonight, I order a pizza with pepperoni and garlic from Gigi's on Harbord Street. Some other time I'll tell you a funny story about that store and the day they were raided by the police for selling drugs to U of T students. Actually, that's pretty much the story right there.
After the dough has doubled, gently punch it down and let rise until doubled again, another 45 - 60 minutes.

Transfer the dough to your (lightly-floured) work surface and divide it into 12 even pieces. I stick with the 'slice-of-pie' system but still can't get everything perfectly even. The same thing happens every year at Christmas dinner and someone is always put-out with the size of their piece.


Using your hands, roll out each piece into a strand about 8-inches long. Anything longer is just showing off.

Wrap each strand into a small knot, one end being on the bottom of the bun and the other sticking out the top through the hole in the middle of the knot. Place them on a baking tray, cover with plastic, and let rise again until the buns become puffy, about 30 minutes.

During the final rise, adjust an oven rack to the lower-middle position and set the temperature to 375° F. After the buns have risen, stir 1 tablespoon of water into the reserved egg white and brush onto the tops and sides. (I don't always use silicone brushes, but when I do, I'm doing an egg wash. Stay eggy, my friends.)

They're writing songs of sesame seeds, but not for me. I always use a few poppy seeds before they go in the oven.
Bake for 11 - 13 minutes or until a deep golden brown. Like full-sized loaves, buns will sound a little hollow when you tap the bottoms.

If you want your bottoms to have a little crunch, you can sprinkle some corn meal on your baking sheet before shaping the buns. Today I felt like softer bottoms, so I didn't bother.

As with all homemade bread, these are best eaten the day they are made. They can be kept in a Ziploc bag for a few days, or frozen for a while and still taste pretty good.

I believe baking is equal parts art and science. I've only been baking bread 'seriously' for a few years and I still screw things up all the time. I think I deleted the pictures of my ill-fated attempt at sourdough - I basically ended up with an 11-inch hockey puck that weighed about 8 pounds. With today's effort, the dough seemed to take a long time to rise and I think it may have been because I put the eggs in right out of the fridge and the cold temperature slowed down the process. Unless otherwise noted (ice-cold butter for biscuits), baking ingredients should be at room temperature. With yeast baking, I've actually taken to using my instant-read thermometer to check my water if a recipe calls for 'warm' water at a certain temp.

After 35 years, I still can't play the violin perfectly so I'm not sure if I have time to perfect my baking, but I love trying. The great 'cellist Pablo Casals still practised four hours a day when in his 90s. When someone asked him why he felt the need to do that, Casals replied, "I'm starting to see some improvement."

PS - I found my sourdough...


Saturday, December 17, 2011

Henderson Christmas Baking Traditions... by Barbara (Ruth)

I'm a pretty nostalgic person on the average day, and at this time of year I kick into overdrive with tradition. I have Christmas lights from the '30s, glass ornaments from the '50s, my stocking from the '60s, record albums from the '70s, and many many other traditions and memories as far back as I can remember.

Like many of your families I'm sure, food is a huge part of our family Christmas traditions. From Mum's savory stuffing to old-fashioned ribbon candy to "Mrs. Santa's butter", we Hendersons enjoy a myriad of festive treats, and try really hard not to worry about our waistlines!

As a baker, I'd like to share the three most special baked treats that make my Christmas every single year. They're not particularly difficult, and I enjoy making them almost as much as I enjoy eating them!

Christmas Plum Loaf
This recipe is over 100 years old, so I'm told. Originally it was made with lard, and yeast cake, and flour that had to be heated, and a few other ingredients that are either extinct or unhealthy or both, so I know it's been modified over the years. I don't have my grandmother's old hand-written recipe, but I have a transcribed version told to me by my Auntie Janet, and it's a good one!

This is a heavy bread made with fat seedless raisins (I assume it used to have plums) and a lot of nutmeg. It is fragrant and delicious and even good stale when toasted. Sitting down with a slice of this and a clementine is nothing short of Christmas morning heaven.


My mother hated to make this. It's a pain and requires lots of stirring and kneading and three risings and patience and exactly the right baking juju to make it work. Some years I have been more successful than others, but I consider it a personal challenge to channel my grandmother and give it a shot. When I was a teenager and discovered my love of baking, I rescued Mum from this job, and Dad and I would make this together.

I plan on taking a slice to him tomorrow in his nursing home to see if the spices and scents reach him like music does.

Fruit Jewels
I have no clue where this recipe comes from - all I have is my own teenaged scribble on an index card, and memories of making this ridiculously easy batch of cookies with my Mum. She would always tell me that I made the cookies too big, but I have never enjoyed bite-sized cookies. Go big or go home!


These are full of chocolate chips and candied fruit, and require a minimum of fuss and cleanup. They look really pretty on a plate, and are as bad as potato chips in that you "can't eat just one". I tried to hide them in the freezer one year so I'd stop eating them. Sadly, they are VERY good frozen.

Light Fruitcake
Now don't roll your eyes, or say "blech". I know many people do not like fruitcake, and I can only guess that it's because they've never had a properly made one. This recipe is from the old Better Homes & Gardens red & white checked recipe book published in 1968 (this was the 3rd printing. It was originally published in 1930 - very interesting history here.)


This recipe is simple and the batter is DELICIOUS. We used this recipe for my sister Elizabeth's wedding cake - I remember my mother substituting fancy nuts like brazil nuts and hazel nuts for the occasion. And every year we made a batch of this cake or the other version, "Dark Fruitcake" (the difference being molasses and the addition of a variety of spices like nutmeg and cinnammon). I like light fruitcake a lot better, and I'm not offended if people don't want any. It lasts forever in the fridge and makes me very happy on a cold winter afternoon with a cup of tea.

Recipes:

Christmas Plum Loaf
  1. Mix together 2 T of yeast with 1/2C warm water and 1 tsp sugar.
  2. Scald 2C of milk and cool to lukewarm.
  3. Combine the yeast mixture with the lukewarm milk, 1C of brown sugar, 1 tsp of salt, and 3C of white flour. Mix well and let rise until light and bubbly (about 1.5 hours).
  4. Melt 1/2C butter and 1/2C shortening. Add 1C brown sugar, 1-2 whole nutmegs grated (this year I added about 3 large nutmegs - we loooove nutmeg), 1 tsp baking soda, 1 tsp lemon flavouring, 2-3C of seedless raisins (I add more like 3C), and 1 egg beaten.
  5. Beat down the risen dough from step 3, and add the mixture from step 4. Mix thoroughly and add 4-5C flour (and no, I can't be more exact... you need enough flour to make a soft, but not sticky dough).
  6. Turn dough out onto a floured board and knead until smooth, adding flour as necessary. (This is tricky. Just enough so it isn't sticky. Any more than that and it will be dry and crumbly.)
  7. Place the dough in a ball and cover with a cloth, and let it rise until doubled (about 2.5 hours).
  8. Punch down the dough and divide into two. Knead each and shape into loaves. Place in greased pans (I spray with Pam), cover and let rise again (about 1.5 hours).
  9. Bake at 350 for about an hour. Check after 30 minutes and if the bread is browning too quickly, cover with tin foil for the last half hour. Tapping the loaves should sound hollow when it's done.
  10. Turn out on cooling rack and let cool completely. Wrap well to store.

Fruit Jewels (double batch - makes about 60)
  1. Cream 1C brown sugar with 1/2C butter. 
  2. Add 1C evaporated milk. Beat well.
  3. Add 4 tsp cinnamon, 1 tsp salt, 2 tsp baking powder, 1 tsp nutmeg, 1/2 tsp cloves. Beat well.
  4. In a separate bowl, mix 4C candied fruit and 2C raisins with 2C white flour.
  5. Add 1.5C chocolate chips and 2T of orange or lemon rind and stir well.
  6. Add wet mixture and stir well. (You need serious elbow grease for this as it gets thick and sticky.)
  7. Drop about 1.5T of batter per cookie on a greased cookie sheet.
  8. Bake at 350 for 12-14 mins.


Light Fruitcake
  1. In a large bowl, mix 1/5C candied cherries, 1C raisins, 1C candied pineapple, 1/2C chopped mixed candied fruit, 1/2C candied lemon peel, 1/2C candied orange peel, 1C chopped walnuts, and 1C of flour.
  2. Mix together so the flour coats all the candied pieces.
  3. In a mixing bowl cream 1C butter and 1C white sugar.
  4. Add 4 eggs, one at a time, beating after each.
  5. Mix 1/4C corn syrup with 1/2C orange juice. Add to creamed mixture, alternatively with 2C flour.
  6. Fold in fruit and nut mixture. (The recipe calls for 1/4C orange juice and 1/4C wine. I just use orange juice.)
  7. Pour into 2 greased loaf pans (again, I used Pam. And you'll see I used one loaf pan and four mini pans.)
  8. Bake at 275 for 1 hour. A knife inserted in the centre should come out clean.
  9. Turn out onto cooling rack and let cool completely. Wrap well to store.

Wednesday, December 07, 2011

The Little Yellow Box: Favourite Recipe #4 - Carnation 5-minute Fudge... by Barbara (Ruth)


If you've been reading for a while, you may remember that many moons ago when I was much better at posting regularly (sigh), I committed to making a few favourite childhood recipes from my Mum's little yellow recipe box.  I've posted about Wacky Cake, Baking Powder Biscuits, and Sweet and Sour Meatballs. I have really enjoyed my trip down memory lane, and wish the last couple of months hadn't been so hectic so I could have done a few more!


Anyway, tonight was a perfect night to make fudge. I had a bit of a weird day at work, and I needed to de-stress - that usually means baking (and making happy co-workers the next day)! This is a recipe I fondly remember making when I was a kid. Don't believe me? I have proof:
This is probably 1969 or 1970. I'm making this fudge recipe with my
sister Janet. I figure Mum had us do this to make me feel better. (With the
dark under-eye circles, it looks like I had been sick!)
Honestly this is one of the easiest recipes in the world. You can make several variations by adding nuts, coconut, dried fruit, or peppermint/almond/orange extract (or any combination of those options!). Tonight I made a plain recipe and sprinkled smashed candy cane pieces on top to be festive. Just make sure you have Carnation Evaporated Milk, chocolate chips, and some marshmallows on hand, and then be creative!


Step 1: Combine 2/3C evaporated milk, 1 2/3C white sugar, and 2 T butter in a medium saucepan. Heat to a rolling boil, and cook for 5 minutes (hence the name of the recipe) stirring constantly.
This stage is mesmerizing. You have to stir all the time while
the sugar forms, and it smells wonderful, like you're in a
candy factory.
Step 2: Stir in 2C mini marshmallows (I only had giant ones, so I snipped them with scissors in order to get a proper measure), 1 1/2C chocolate chips, and 1 tsp vanilla into the hot liquid until it is well mixed. (You would add nuts or any other items at this point if you wanted to.) It gets tough to stir pretty quickly, so use that elbow grease!


Step 3: Pour into a greased 9" square pan (I just sprayed it with Pam), and spread quickly before it sets. Sprinkle any toppings on, and place in the fridge to set!


Cut into 1" cubes and enjoy.


Saturday, November 19, 2011

Variations on a Cookie by Anna Olson....by (Angela) Jean


I've been a fan of Anna Olson for years. I used to watch her show on the Food Network all the time and I have 2 of her cookbooks, 'Sugar' and 'Another Cup of Sugar'.


The recipe I have used the most is from Sugar and is for Chocolate Chip Cookies. It's the best recipe for CCCs I have ever tried and everyone, everyone loves them. They make a chewy cookie (which I love) because they have a little cornstarch in them. That's the secret!

We are going to visit some friends tomorrow and I thought I would bring some cookies with me. These friends are Italians, and amazing cooks so I was a little nervous about what to bring. They've got two little kids, so I think cookies are a safe bet!

I wanted to shake it up a bit so I went to my magical baking cupboard to see what I could find.

Lots of goodies!
I decided to double the recipe and then divide the batter into thirds before adding the chocolate chips.
In one batch I added peanut butter chips and pecans.

In the second batch I added coconut, dried cranberries and white chocolate chips.

For the final batch I stuck with classic chocolate chips.

The kids were eager to help. They love adding the chips.And as an aside, I think the real trick to baking with kids without getting frustrated is preparation. When the kids are going to be involved I set up like I'm on a cooking show (this helps for getting fun photos too). I pre-measure all the ingredients and have them in little bowls or ramekins. That way all the kids have to do is add and stir! Sometimes Amelia helps with the measuring too, but not Otis...he's strictly a 'dumping in' kind of guy.

The kids are now in bed and I'm here staring at 5 dozen cookies. I sure hope they last until the morning...

Oh! Do you want to know which were my favourite?

The pecan and peanut butter chip ones. Deeeeeelish!
Here's the original recipe, but I challenge you to create your own variation masterpieces!

Ingredients

Chocolate Chip Cookies

  • 3/4 cup unsalted butter, softened
  • 1 cup brown sugar
  • 1/4 cup granulated sugar
  • 1 unit egg
  • 2 teaspoons vanilla extract
  • 2 cups all purpose flour
  • 2 teaspoons cornstarch
  • 1 teaspoon baking soda
  • 1/2 teaspoon salt
  • 8 ounces bittersweet chocolate, cut into chunks

Directions

Chocolate Chip Cookies

  1. Preheat oven to 350 F.
  2. Cream together butter and sugars until smooth. Add egg and vanilla and blend in.
  3. Stir in flour, cornstarch, baking soda and salt. Stir in chocolate chunks.
  4. Drop by tablespoons onto a greased baking sheet and bake for 8-10 minutes, until golden brown around the edges.

Thursday, November 17, 2011

Celebrate with Pumpkin Cake....by (Angela) Jean

I firmly believe that when you make a cake, it should taste as good as it looks. I love a fancy-looking cake as much as the next gal, and I'm truly amazed by the creativity of cake artists, but what good is a cake if it tastes...well....blah?

I hosted a birthday party for a dear friend last Friday and I decided to make pumpkin spice cake. You can use canned pumpkin for this cake, but it is SO easy to roast your own that I strongly encourage you to do so. If you roast a couple of pumpkins you can use the rest for soup, or even freeze it for later.

Cut the pumpkins in half, and scoop out the seeds. Place them face-down on a baking sheet (I line mine with foil, but I don't think you have to) and roast at 350 degrees Farenheit for about an hour. Just like that. No oil, nothing.


When the pumpkin flesh is soft and you can easily scoop it out with a spoon it's done.

Pumpkin Birthday Cake
This recipe is adapted from several different recipes I have tried over the years. It makes a big batch of batter so you can bake three large loafs, or 48 cupcakes. This time, I made 2 8-inch layer cakes, and 12 cupcakes.


Ingredients 
  • 2 cups pumpkin puree
  • 4 eggs 
  • 1 cup vegetable oil 
  • 1/3 cup water (a bit more if you use canned pumpkin) 
  • 2 1/2 cups white sugar
  • 3/4 cup packed brown sugar 
  • 3 1/2 cups all-purpose flour 
  • 2 teaspoons baking soda 
  • 1 1/2 teaspoons salt 
  • 1 teaspoon ground cinnamon 
  • 1 teaspoon ground nutmeg 
  • 1/2 teaspoon ground cloves 
  • 1/4 teaspoon ground ginger
Preheat oven to 350 degrees F (175 degrees C). Grease and flour baking pans or muffin tins. 
In a large bowl, mix together pumpkin puree, eggs, oil, water and sugar until well blended. 
In a separate bowl, whisk together the flour, baking soda, salt, cinnamon, nutmeg, cloves and ginger.

 Stir the dry ingredients into the pumpkin mixture until just blended. Pour into the prepared pans.
I used these really cute silicone baking cups. They look great, but are a bit of a pain because you have to wash them after. Part of the beauty of cupcakes is the absence of washing up!

Bake for about 50 minutes.(cupcakes take about 25 minutes) 
Cakes are done when toothpick inserted in center comes out clean.

These cakes smell and taste divine! The kids loved them and hey, they got an extra serving of vegetables with dessert! 
I used this Martha Stewart recipe for cream cheese frosting.

  • 8 ounces cream cheese
  • 8 tablespoons (1 stick) unsalted butter, room temperature
  • 2 cups confectioners' sugar, sifted
  • 2 teaspoons pure vanilla extract
Place cream cheese in the bowl of an electric mixer fitted with the paddle attachment. Beat on medium speed until smooth. Add butter, and beat until fluffy.
Reduce speed to low; gradually add sugar, and continue beating until light and fluffy. Add vanilla, and mix to combine. 
Happy Birthday, Auntie Burt. Biggie says 'hi'.