Friday, April 13, 2012

Field Trip Friday-Episode #6-Spring at the Homestead

Today is Friday the 13th, and around here that means a lot of motorcycles on the road, heading toward Port Dover. The date had completely slipped my mind, but as soon as we hit the road for today's Field Trip, we were reminded. Amelia noticed first. "Mama! Look! A million motorcycles!!" It was all very exciting.

The original focus of the Field Trip was a trip to my sister's farm (or homestead, the term they prefer). My sister, along with her husband and 4 young children, moved to a 19 acre property a few months ago. Neither of them are what you would call 'country folk', but they are energetic, enthusiastic and willing to learn what they need to know to have the kind of live they envision for their family. From what I understand, the plan is to work toward becoming as self-sufficient as possible, starting with raising and growing their own food.

Not only is it fun to visit our cousins, the drive to get there is peaceful, and chocked full of fun little towns and inspiring vistas.
Any town with a Watermelon Festival is worth a visit, in our opinion.
Gesundheit
Where the letters to the Corinthians are sent, I presume.

The first time we visited was in February.


We toured the house and property and got a feel for what their new life was going to be like. We even got to meet Minew, the cat that belonged to the previous owners of the property. They were in a temporary location for a few months, so they thought it would be best for the kitty if she stayed on the farm until they were settled. She incredibly friendly and followed us everywhere we went.

Mimi was enchanted.

Minew's humans came to collect her a few weeks ago, and I'm sure she's happy and settled into her new home. I must say though, I was sad not to see her run up to the car when we arrived this morning.

Today's visit was all about spring!
This is their first year on the property so they are just getting started with acquiring livestock and planting fruit trees and other edibles. The property already has some fruit trees, and other fruit bearing shrubs like raspberries and blueberries. My sister is so excited to see the plant life begin to come alive and all around the property.
It's too early to get started in the vegetable garden, but the forest is alive with wildflowers.
The sides of the wooded ravine are blanketed with trilliums...a mesmerizing site. I have spotted trilliums here and there on forest floors before, (you cannot have attended a school field trip in Southwestern Ontario and not hunted for them....I think it's in the curriculum, or something....) but this was just extraordinary! There were so many, you had to be very careful not to stomp on them.
Most of the flowers were white, but we did spot a few dark purple as well.
Dotted among the trilliums were a few, delicate Dogtooth Violets.
Erythronium dens-canis, 'dogtooth violet'
The first time we visited, the chicken coop was cold and void of chickens,
posing by the chicken coop in February
but now it is filled with 6 laying hens.....
They seem quite happy, and I think they're pretty cute....for chickens.
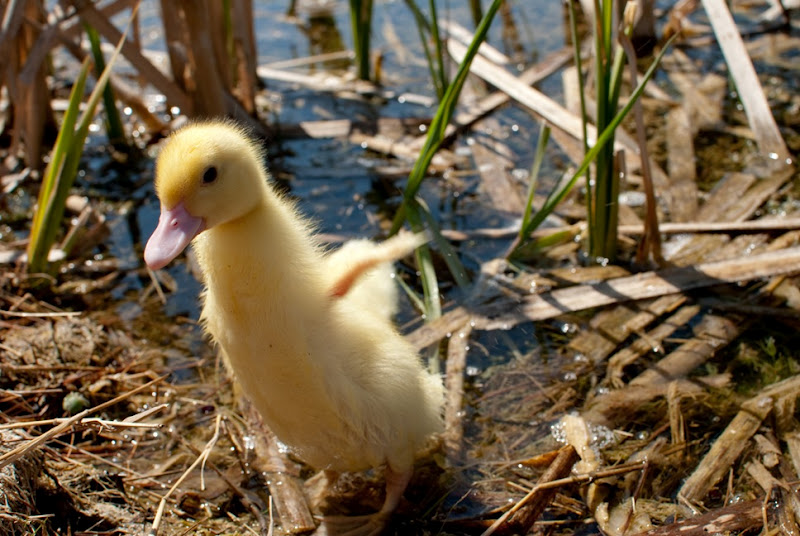
But if it's cuteness you're after, you really can't top ducklings.
Muscovy ducklings, 4 days old.


These two little ducklings (tentatively named Duck-Duck, and Goose) are 4 day old, Muscovies. They are cute now, but from what I've learned that won't last too long. They best quote I read on the internets tonight was "what kind of duck is that, and what is WRONG with it's face!" 
Adult Muscovy
 

Let's just enjoy them while they are gorgeous, shall we?
We had a great day exploring the country life. I can't wait to go back and help plant the veggie garden!

Wednesday, April 04, 2012

Easter (sort of) Cinnamon Buns... by Barbara (Ruth)

Forgive me dear readers, for I have sinned. It has been 5 weeks since my last blog posting! My blogging partner (Angela) Jean and I were out last night talking about our blog (which, by the by, celebrated its one year blogiversary on March 6th), and about how we have been remiss in our regular postings lately. (Angela) Jean has a great excuse in the form of a horrible 3 week flu followed by a family vacation. I, however, have no excuse. In the absence of her posts I simply forgot! I have been quite taken up with my new business, Whiteboard Consulting, but that's no excuse.

Anyhoo, I'm back.

Last year at this time I made hot cross buns and posted (here) about why they are part of my Eastertide celebrations. I thought that today I would write about another sweetbread that my Mother often made around the same time. (To be honest, she made them all year round, but baking seemed a great way to get me back into the blogging frame of mind.)

I have a recipe that is so special it's written down in several places - all on scraps of paper covered in drips of oil and egg. The recipe is simply "Muzzer Rolls" (as a kid we called my mother Muzzer), and is incredibly easy and tasty. She used to make them to go with "Muzzer Soup" (also written on scraps of paper) to feed the hungry teenagers on school nights. I've made them for dinner parties and usually there are no leftovers!

One of the variations is to turn "Muzzer Rolls" into cinnamon buns, and that's what I did today. I'm headed to a friend's family cottage north of Kingston, Ontario tomorrow, and the cinnamon buns are part of my contribution to the Easter treats. Baking them was almost as much a treat for me, as I think of my Mother every single time I make these. Also, the house smelled terrific!

I hope you enjoy these. They aren't at all healthy, but man they are delicious!
Ready to go in the oven...

Fresh out of the oven...

Turned out, gooey, warm, and delicious!


Muzzer Cinnamon Rolls

  1. In a mixing bowl, stir together 1C warm (not hot) water, 1 tablespoon yeast, 1 teaspoon salt, 1/4 cup white sugar, and let it bubble.
  2. In a separate bowl, whisk together 1/4 cup warm water, 1/4 cup canola oil, and an egg.
  3. Once the yeast mixture has bubbled, stir in the egg mixture. 
  4. Using the dough hook attachment, stir in about 4 cups of white flour, and allow the dough hook to mix thoroughly (about 10 minutes on slow). The dough should be sticky but not wet.
  5. Turn dough out onto floured countertop, and knead by hand for 5 minutes or so, until the dough is smooth. 
  6. Shape into a ball and place back into the bowl. Cover with a dishtowel and let rise until double, about 90 minutes.
  7. Melt a stick of butter, and pour half into a 9x13 baking pan. (I use a glass pan so I can tell if the sides and bottom of the bread is done before taking it out of the oven.)
  8. Use your finger to grease the sides, bottom, and corners of the pan. There should be lots of butter left in the bottom of the pan.
  9. Pour a healthy amount of corn syrup over the bottom of the pan. I can't tell you how much - just drizzle it all over. It depends on your sweet tooth, I guess.
  10. Put the dough back on the shelf and punch it down, then knead for a few minutes. Use a rolling pin to roll it out into a rectangle, about 12 inches wide, and about 1/4" thick.
  11. Use a pastry brush to spread melted butter all over the dough. Pour any remaining butter into the pan.
  12. Sprinkle brown sugar, raisins, and cinnamon over the buttered dough. Again, I can't tell you how much - it depends on your taste. The more the better, in my opinion.
  13. Start at a long edge of the dough and roll it up into a long cylinder shape. Using a serrated knife, cut into 12 equal pieces, and place into the pan.
  14. Cover with a dishtowel and let rise for about an hour.
  15. Bake at 350F for about 15 minutes. 
  16. Check the rolls and if the tops are browning quickly, cover with tin foil.
  17. Bake another 5-10 minutes, checking to see if the sides are cooked.
  18. Turn out onto a cooling rack covered with tin foil.
  19. Best served warm, but also terrific heated up the next day!

Monday, March 26, 2012

Photo Assignment comments....by (Angela) Jean

 A few people have sent messages saying that they would be interested in hearing what my photography professor had to say about my assignments.

I have updated the posts for my main assignments and included his feedback.

Click on the links to read his comments.

Assignment #7-The Alphabet

Assignment #4-Activity Assignment

The final class of the term is this Wednesday night. I have learned so much in this course I will be sad to have it end. Time to look at the course calendar and see which course is next!

Tuesday, March 20, 2012

Photography Assignment #8....by (Angela) Jean

Where has the time gone? It's been almost 3 weeks since I posted? Shame on me!

And here we are, the final assignment of this semester's photography course. I completed this one almost 2 weeks ago because we were going to be on vacation the week it was due (vacation post to come shortly). It was right up my alley since my portraits are my favourite things to shoot. Here is the exact assignment:

Available Light Portraits
Create 6 semi-formal portraits using only the light that exists in your location (indoors), no supplementary light sources or flash allowed. Process the files yourself with either Photoshop, Lightroom or your camera software.
 
And here are my shots.

Ian
Madeleine

Samantha
Samuel
Mimi
Mr. Finch
Oh, and are you interested in hearing my instructor's feedback from the previous assignments? I have received some for my previous 2 assignments, but I wasn't sure if anyone wanted to know what he said. He gives amazingly detailed feedback and I'd be happy to share it because I am a firm believer that we all learn when we share.

Saturday, March 03, 2012

Photography Assignment #7-The Alphabet....by (Angela) Jean (updated with instructor feedback)

Some of you have messaged me saying that you would be interested in seeing the feedback from my photography instructor. I found his comments and examples very interesting so I decided to share them.

The latest assignment for my photography class was a creative assignment.

"Produce 13 photographs from the alphabet. The subject must convey a letter from the alphabet. Some letters will be obvious while others will require careful observation. Cropping (limited) is allowed, but no rotating or flopping the image. The images may be man-made, but not created to be that. Do not photograph a letter A from a sign and use it as an A. The observer should easily  recognize the object. Pictures that show you are looking and observing. Colour or black and white."

This was a bit trickier than it initially sounds, but I found it challenging and fun. My preference is usually to photography people, but it was a refreshing change to shoot things that didn't move.

Here are my submissions. See if you can figure out the letters. I'll leave a comment at the end of this post with all of the letters in case you get stumped.

  • All of the technical requirements of the assignment have been met.
  • This is an interesting interpretation. It feels a bit funny, because I think it is a support for an air conditioner. If it were really on this kind of angle, I would call someone to come and fix it.

  • Good use of depth of field.
  • Interesting idea. Not so much set up as the most unusual way to keep a grater. (I think he is suggesting I don't store my grater this way, but I actually do. It is lying on top of the hanging pot rack above my kitchen island.)
His re-edited version

  • This is an interesting idea. I think you need to increase the contrast in order to really make it work. This is one of the few times when you have a neutral, shadow and highlight that are all easily identifiable.
  • This works well
His re-edited version

  • This may be a realistic interpretation of this portion of the chandelier, but realistic doesn't always result in the best image. I think that if you lighten the image and change the black point you can make a far more dramatic image that makes the letter pop.

  • I think the image is good but not as effective as it could be because it is so dark.
  • This is a pretty good idea. I think that the composition could be tightened up. Withe the key part of the image is part of a circle I think you could make this stronger by cropping fairly tight around the clock. Essentially putting a circle in a square.
his re-edited version
  • I think due to the overexposed feeling of this image that it lacks impact. If you recover some sky detail and darken the shadows, the image is easier to read and more interesting.
  • This is a good shot, but the blown out sky is a distraction. I think you need to use some recovery for the highlights and then a little fill light for the shadows.
  • This works, until the weather cooperates with the real thing.
There are some very interesting interpretations in your assignment. If you go for the suggestions I
have made I think you can raise the overall quality of the assignment. Learning the numbers and
experience will make a huge difference to what you can get out of each file. Once you start to see the
possibilities of working in Camera Raw to get the most information and impact from each of your files I think you will find that you can make more compelling images than the standard camera jpeg.
I would be interested on seeing what you could find to finish off the alphabet. With more time on your
hands in the future I think that would be a fun assignment to finish off.