Friday, September 16, 2011

A crafty day that ended with macaroni

One of the things I enjoy most about being home with the kids is that now any day is a good day for getting crafty.
It was a beautiful late summer day, so we decided to take advantage of the sunshine, by painting outside.
Painting with little kids is so much fun, and when you can be outside there is much less anxiety about getting paint everywhere. I just hosed them off when we were done.

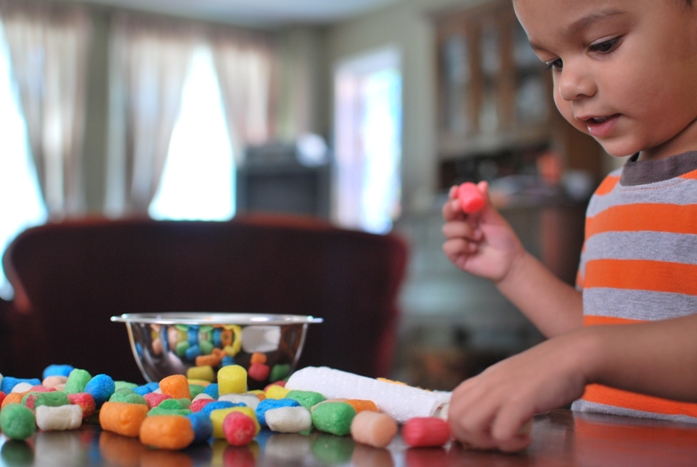
The rascals were still in a crafty mood after painting, but I wasn't interested in any more clean-up-heavy activities so I got out the PlayMais.
If you haven't seen this stuff before, it's made from corn and has the consistency of foam peanuts.
It's completely non-toxic and more importantly non-messy. The little beans stick together when you dampen them with a moist felt cloth. You can squeeze them and cut them into smaller pieces.
We reuse ours over and over again. The kids love them because they are light and very easy to handle and hold and they stick together however you want them to.


Mommy helped with these.
I love them because they are easy to clean up and they occupy rascals long enough to prepare silly lunches.

While eating lunch, Mimi and I were chatting about how crafty our day had been and she suggested that a crafty day should end with "Craft Dinner". She has no idea what Kr@ft Dinner really is, she's just heard other kids talk about it. (Don't get me wrong though, I've eaten my fair share of KD, but neither Shawn or I grew up eating it as kids so we never think to have it in the house.) I checked the cupboards and fridge, confirmed we had the necessary(ish) ingredients and said, "Sure! Let's make macaroni and cheese-Abelattanzedinio Style!" (Errr, to be completely honest, it's Martha Stewart style).
I'll warn you now. If you are looking for a quick recipe to make for dinner this is not the one. Grating the cheese alone takes longer than making KD! This is also not a budget saving recipe. I think mine used about $15 worth of cheese alone. I'm a cheese snob though. Judge me if you must.
All that said, it's a very, very tasty recipe and it makes a big batch, so you will have some to freeze for later when you do need something quick. I've made this recipe at least, oh I dunno, 20 times? I've served it to company and everyone loves it. It's worth the time and effort. There are not many things more comforting than a hot bowl of macaroni and cheese.

Ingredients

  • 8 tablespoons (1 stick) unsalted butter, plus more for dish
  • 6 slices good white bread, crusts removed, torn into 1/4- to 1/2-inch pieces (I used half a day-old baguette)
  • 5 1/2 cups milk
  • 1/2 cup all-purpose flour
  • 2 teaspoons salt
  • 1/4 teaspoon freshly grated nutmeg
  • 1/4 teaspoon freshly ground black pepper
  • 1/4 teaspoon cayenne pepper, or to taste (I love the cayenne in this recipe! Don't leave it out!)
  • 4 1/2 cups grated sharp white cheddar cheese (about 18 ounces)
  • 2 cups grated Gruyere cheese (about 8 ounces) or 1 1/4 cups grated Pecorino Romano cheese (about 5 ounces) (I use both...I also used about a cup of grated mozzarella that we had left over from making pizza)
  • 1 pound elbow macaroni (I use more than a pound....probably more like 1.5 pounds)

Directions

  1. Heat oven to 375 degrees. Butter a 3-quart casserole dish; set aside. (I skip this step) Place bread in a medium bowl. In a small saucepan over medium heat, melt 2 tablespoons butter. Pour butter into bowl with bread, and toss. Set breadcrumbs aside.
  2. In a medium saucepan set over medium heat, heat milk. Melt remaining 6 tablespoons butter in a high-sided skillet over medium heat. When butter bubbles, add flour. Cook, whisking, 1 minute.
  3. While whisking, slowly pour in hot milk. Continue cooking, whisking constantly, until the mixture bubbles and becomes thick.
  4. Remove pan from heat. Stir in salt, nutmeg, black pepper, cayenne pepper, 3 cups cheddar cheese, and 1 1/2 cups Gruyere or 1 cup Pecorino Romano; set cheese sauce aside.
  5. Fill a large saucepan with water; bring to a boil. Add macaroni; cook 2 to 3 minutes less than manufacturer's directions, until the outside of pasta is cooked and the inside is underdone. (Different brands of macaroni cook at different rates; be sure to read the instructions.) Transfer macaroni to a colander, rinse under cold running water, and drain well. Stir macaroni into the reserved cheese sauce
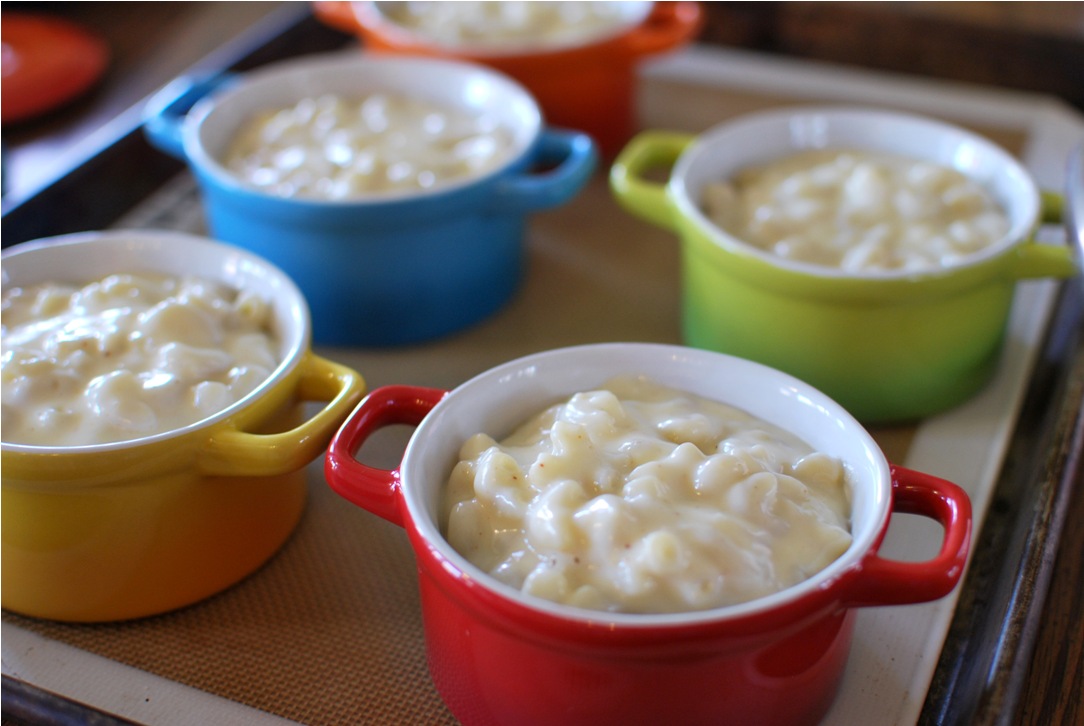
  6. Pour mixture into prepared dish.
    I love using these mini casserole dishes and the rascals love picking their colours.

    Sprinkle remaining 1 1/2 cups cheddar cheese, 1/2 cup Gruyere or 1/4 cup Pecorino Romano, and breadcrumbs over top.
    Bake until browned on top, about 30 minutes. Transfer dish to a wire rack to cool 5 minutes; serve hot

    This one went into the freezer for another day.

    This recipe doesn't disappoint, so if you have the time and the cheese I suggest you try it. I've also added veggies (broccoli, peas etc) from time to time, and you wouldn't be crazy if you threw a little bacon in there too. Mmmmmm.....bacon. Enjoy!
     P.S. Here's my little photographer/food stylist getting a good shot on her own camera.

Thursday, September 15, 2011

The Little Yellow Box: Favourite Recipe #2 - Baking Powder Biscuits... by Barbara (Ruth)

I went for a walk this evening and was overwhelmed with the feeling of autumn - the air was cool, the stores in my neighbourhood had little gourds and pumpkins and pots of mums, the leaves were falling, and the air smelled clean. I had a sudden urge to bake something and make hearty soup.

This urge fit in with my blog series nicely, as one of my favourite recipes from my mother's little yellow box is for baking powder biscuits. I did some googling to find out how old the recipe is, and I found a really neat one dating back to 1922 that used the exact same ingredients but in larger quantities to feed a group of cowboys! Wikipedia tells me that biscuits became popular in the early 19th century because they're filling and don't use yeast, which was expensive and hard to store.

Whatever the history, they are a big part of Henderson family dinner time memories. Mum used to make amazing stews and soups, and of course we had biscuits with those. We had biscuits after school for a snack. Dad and I even had biscuits with molasses as a treat after dinner. Really, there were few meals that couldn't be made even better by biscuits.

My sister Elizabeth is now the Queen of biscuits in our family. I'm not sure what she does, but hers are lighter, tastier, and bigger than anyone else's. Nonetheless, I popped a batch in the oven tonight - it's hard to wreck this recipe, so I hope you give it a try.

I remember when I asked my mother to write this down. "Well I don't know how I make them Ruthie, I just make them!" What follows it what she wrote down. (With some edits from yours truly.)

Baking Powder Biscuits
2 C Flour
1 C Liquid (2/3 milk, 1/3 oil)
3 tsp Baking Powder
Approx 1/2 tsp or a bit more of salt (today we might say, salt to taste)
I don't use sugar, but you can add a touch if you want (I did, about a tablespoon)
(Also, you can add seasonings as you wish - we used to add caraway seeds... yum...)

Mix the dry in a bowl - add the wet and stir only as much as necessary. Spoon into muffin tins or place on cookie sheet. (Note - I spray with Pam. Mum didn't, as she thought the dough was greasy enough without it.)

Recipe can be cut in half ok. If you want to be fancy - eg shortcake - you can use solid margarine (she never EVER bought butter... now I wonder what solid margarine was... ew...) instead of oil and cut it in with a pastry blender as if you were making a pie. Then add the milk and mix gently. Grated cheese may be added - cut back on the oil.

Bake at 400 for 15-20 minutes or so (I only needed 15 mins. 13 would have been perfect.)


This makes about 12 small-med biscuits. You can roll them out (gently) and use a biscuit cutter, but I just use a spoon and drop into the muffin tin. Also, a word of caution - these get stale quickly, so freeze whatever you don't eat right away.


Sunday, September 11, 2011

The Little Yellow Box: Favourite Recipe #1 - Wacky Cake... by Barbara (Ruth)

I'm excited to begin my series on recipes from my mother's Little Yellow Box. First up, Wacky Cake.

Sounds intriguing, doesn't it? "Wacky Cake."

Well, it turns out that, more than just being a Henderson family favourite through the 60s and 70s (and today, quite frankly), this simple little cake has quite a history of its own.

This isn't the exact one we had, but it
was very similar. Pretty young Grandma,
wouldn't you say?
Mum found this recipe in a war-time cook book. More of a pamphlet, really. I don't have it anymore, but I remember recipes that had helpful instructions like "add enough flour," or "bake in a hot oven until done". I suppose just about every good housewife knew how to cook back then, and knew how much flour was "enough" and how hot an oven needed to be!

Wacky Cake, so the story goes, was a recipe born out of the scarcity of eggs and milk. Depending on which source you believe, it goes as far back as the first world war, but is mentioned more in the 30s and during the second world war. The use of vinegar in the recipe causes a reaction with baking soda that ensures it is light and fluffy, thus making up for the lack of eggs and milk.

The cake is chocolatey and delicious, and - believe it or not - vegan (before vegan was even an idea), and literally takes 5 minutes to prepare. This cake was a staple at our house - whipped up quickly to satisfy starving teenagers, prepared for birthday events when eggs were left off the grocery list, or just made for afternoon tea. Not only does the mention of Wacky Cake stir up fond memories, but it is a favourite to this day in all the extended-Henderson households!

I hope you enjoy it:

Wacky Cake
1.5 C Flour
1 C Sugar
1 tsp Baking Powder
1 tsp Baking Soda
Salt (How much, you ask? The recipe doesn't say. I use about half a teaspoon.)
3 T cocoa
5 T shortening (I use canola oil.)
1 tsp vanilla
1 T vinegar
1 C water

This recipe is supposed to be one that you can mix, bake, and serve in one pan. I prefer to mix it separately because I use Pam to prepare my baking dish. Stirring after spraying the pan makes the Pam less effective.

1. Mix the dry ingredients together in a mixing bowl.
2. Add the wet ingredients and stir until mixed. (I use a whisk because it keeps it light and airy.)
3. Pour into prepared pan.

That's it.

Oh - I guess you want to know how to bake it? Well, your guess is as good as mine, since those instructions aren't in the recipe. I baked it at 350 for 25 minutes, checking frequently. I used a 9x13 pan, so baking time would vary if you use a square pan.

Once it's done, let it cool and sprinkle it with sifted powdered sugar once it's cool. That's all there is to it!

Unless you're a Henderson and want marshmallows on top. In that case, skip the powdered sugar. Instead, use scissors to snip regular-sized marshmallows in half, and place them evenly on top of the cake after it cools a little. (You can also use those multi-coloured mini-marshmallows.)


Place under broiler, watching constantly - they suddenly go from white to black if you're not careful. When the marshmallows are golden brown, you're done.

And that, my friends, is Wacky Cake. Warning: there will be no leftovers.

Friday, September 09, 2011

The Little Yellow Box ... by Barbara (Ruth)

While at the cottage this summer I happened upon my Mum's recipe box, tucked away on a shelf in the pantry. It's a cheap old recipe box, bright yellow plastic with a peeling label on the outside. But on the inside - so many memories!

Mum does not like cooking much. Like me, she prefers to bake, and her bread was always out of this world. However, six Hendersons can not live on bread alone, so Mum did her very best to put healthy and hearty meals on the table. (Most of the time she was very successful, although there are a few stories of epic fails that still make us laugh.) We were a meat-and-potato family fond of plain Waspy food (I use the past tense because all four daughters are now big fans of cooking and eating a variety of ethnic and spicy foods), and we came to rely on certain tried-and-true meals. It was inevitable that I grew up learning to bake these simple and tasty recipes - not very exotic, but "delicious and nutritious" (a favourite saying in our house). This is probably why I love to make bread,  stew, soups, and casseroles - the comfort food of the 70s!

The bright yellow recipe box contains many of the recipe cards that Mum neatly wrote out and used time and time again. I see the stains on them and remember all the times we sat around the table sharing her BBQ spareribs or sweet and sour meatballs. I can see my older sisters rushing to eat Mum's special soup and dinner rolls before heading out to a track meet. I remember making cookies and kneading bread and helping Dad make his family's 100+ year-old Christmas bread recipe. Basically, these recipe cards help me remember my childhood in the kitchen in the 70s.

There are also a number of party recipes. Mum and Dad were great for throwing dinner parties and bridge parties, and the three different recipes for punch that are in this little yellow box remind me of all the times I sat at the top of the stairs watching the adults laugh and play cards and eat Nut Chocolate Bars, snack on "Nuts-n-Bolts" and drink cranberry punch. My memories of those parties are very Mad Men-esque, right down to the horn rimmed glasses, hats and gloves, and wood-paneled walls, but minus the smoking.

Then there were the desserts. Pineapple Bridge Dessert, Mrs. Lighthall's pudding, Ginger Cookies (this recipe says "add enough flour to roll out"), Wacky Cake, High Hat Rhubarb, Princess Pudding, Molasses Sugar Cookies, and Apricot Cheesecake. Whenever there was a potluck event of any kind, Mum could be counted on to take a dessert. Or two! I'm the same way... I just love baking desserts and will happily crank out a couple for any kind of event.

So, I've decided to do a series of blogs over the coming few weeks, making one of the more memorable recipes from this little yellow box each time, and reminiscing about why the recipe is special. I promise they will be excellent recipes that you will want to add to your repertoire too!

First up this weekend will be Wacky Cake. Stay tuned!

Tuesday, September 06, 2011

Peach Pie...by (Angela) Jean

I have always been more of a cake person than a pie person, but at certain times of the year, I am drawn to pie. One of those times is right now. Peach season.
There is nothing like the taste of fresh-picked, Ontario peaches in August. In fact, I refuse to eat peaches at any other time of year. They might look good in the grocery store display, but inevitably they taste watery and bland, and I'm disappointed. Instead, I choose to get my fix in August and early September, preferably with peaches from my local Farmers' Market.
This year I wanted to take a stab at peach pie. My sister-in-law has always made an excellent peach pie, and at a recent family reunion I chatted about peach pie with my cousin-in-law, Hannah (an excellent baker herself!) and they both inspired me to give it a shot.

Two weeks ago I bought 4L of fresh peaches from the Farmers' Market.
They were so juicy and bursting with flavour that we ate them all in two days. They didn't even make it into a pie, cobbler or anything else.

The following Thursday, I bought another 4L basket and promised Shawn that I would make the pie. I used the Pâte Brisée recipe from the Martha Stewart Baking Handbook for the crust.
  
Ingredients
  • 2 1/2 cups all-purpose flour
  • 1 teaspoon salt
  • 1 teaspoon sugar
  • 1 cup (2 sticks) unsalted butter chilled and cut into small pieces
  • 1/4 to 1/2 cup ice water

Directions

  1. In the bowl of a food processor, combine flour, salt, and sugar. Add butter, and process until the mixture resembles coarse meal, 8 to 10 seconds.
  2. With machine running, add ice water in a slow, steady stream through feed tube. Pulse until dough holds together without being wet or sticky; be careful not to process more than 30 seconds. To test, squeeze a small amount together: If it is crumbly, add more ice water, 1 tablespoon at a time.
  3. Divide dough into two equal balls. Flatten each ball into a disc and wrap in plastic. Transfer to the refrigerator and chill at least 1 hour. Dough may be stored, frozen, up to 1 month.
This was my first pie crust ever, so it was a bit lacking in finesse and polish. I need a bit more practice with the rolling out and edging. Every recipe I read, went on and on about making sure not to handle the dough too much, so I was paranoid and worked as quickly as I could. Despite not being the prettiest pie ever, the crust tasted great. It was a perfect texture, flaky and light.

For the filling, I created my own recipe after reading many, many recipes online and in my library of cookbooks.

Ingredients

10 peaches, peeled and sliced (this was the most boring and labour intensive part of the whole thing)
1/3 cup granulated sugar
1/3 cup golden brown sugar
1 tbsp good quality maple syrup
2 tbsps cornstarch
1/4 tsp course salt
Juice of half a lemon (about 1 1/2 tbsp)
2 tbsps of cold, unsalted butter, cut into small pieces
1 egg yolk and 1 tbsp heavy cream for the egg wash

Directions for filling and pie assembly.
  1. Preheat oven to 425 degrees Fahrenheit.
  2. In a large bowl, stir together peaches, sugars, maple syrup, cornstarch, salt and lemon juice. Refrigerate.
  3. Remove chilled dough from refrigerator. Lightly flour a rolling pin and work surface and roll out half the dough to a 12-inch round. Place in a 9-inch glass pie plate. Pour in fruit filling, making a slight mound in the centre, and dot with butter pieces.
  4. Roll out remaining dough to a 12-inch round and place over fruit filling. I cut a little heart in the centre of mine. Trim excess and crimp edges to seal. In a small bowl, lightly beat egg yolk with heavy cream. Brush top of dough with egg yolk mixture. Set on a rimmed baking sheet and bake at 425 for 15 minutes, reduce heat to 350 and bake for an additional 40-45 minutes or until crust is a deep golden brown and juices are bubbling. Let pie cool completely on a wire rack, about 3 hours.

I was quite pleased with the result. The filling was perfect...not runny at all, and it was bursting with peach flavour. Many of the recipes I read included allspice, nutmeg or cinnamon, and even though I adore all of those spices, I resisted and just let the peaches speak for themselves. They did not disappoint.

Next pie on my list is apple. Stay tuned!

Monday, September 05, 2011

Happy New Year!...by (Angela) Jean

To me, the beginning of September, and Labour Day specifically, have always felt more like a New Year than January 1st. I'm sure it's because growing up, the new school year always started the Tuesday after Labour Day. There was such a distinction between the seemingly endless, carefree summers: hanging out with my siblings, cousins and friends, music camp, the Goossens' cottage, summer jobs, and the school year's rigid schedule: music lessons, homework, tests, exams. I loved school though, and the excitement that came along with the first day...new teachers, new classes, and most importantly new notebooks, piano books, pencils, erasers and pencil crayons. To this day, I still get a rush seeing the store displays of school supplies.
I clearly remember the first year that September didn't start with 'back to school'. It was 1996. I had graduated university and moved to Toronto with a music degree and not much else. It felt weird. I felt drawn to the stationary store. I needed to buy pens.
There were a few years in the late 90s when my life didn't revolve around the school year schedule, but then Shawn decided to go to teacher's college and once again, September represented a new year for us. I didn't need to buy school supplies for myself, but now I could at least go shopping for him; a bonus for him too since he hates shopping!
And then guess what? Both of my kids were born in the summer! I'd love to say I planned it that way, but if you know much about me at all, you know that family building did not come easily, so it was kind of a fluke that we ended up with kids at all, let alone almost exactly two years apart. Both of my maternity leaves began in the summer, and both times I went back to work on the Tuesday after Labour Day. New year. New routine. New job. New boss. New life.
Last September, I went back to work after my mat leave with Otis, and Shawn began a leave of absence from teaching to be home with both kids. He had done the same thing the year Amelia was 1. The plan was for him to stay home, perhaps permanently, and for me to work. We both enjoyed our jobs very much, but we both felt strongly that we wanted one parent at home full time.
I was excited to go back. There were many things I loved about being home, but there were many things I missed about going to work. My work was interesting and challenging and I worked with a great team of really bright individuals (not to mention snappy dressers), but....but, I kept waiting for that moment when I would feel I had adjusted to the new routine, and specifically the commute. I was commuting for 3 hours a day, and since I was doing it with thousands of other people, I thought it must be doable. I thought I just needed to suck it up. If they could handle it, so could I. I didn't want to move, and I didn't want a new job, so I had no right to complain. In March we made the decision to stick with the status quo, Shawn requested another year's extension to his leave.
As the months went by, it got harder and harder. Shawn could see that I was unhappy and kept reminding me that we could make a change. We could switch places. There were options. I repeatedly dismissed him. I really wanted to make it work. I just need to try harder. I needed to adjust my attitude.
And then, in the middle of July I had an epiphany. A dear friend shone a bright light on something that I was trying hard to keep hidden. No amount of trying was going to make me happier. And just like that, I knew what I needed to do. Shawn and I talked it over that night. He formally requested to cancel his leave, and with his blessing, I resigned the next morning. It was tough, really tough. I didn't want to feel like I was running away from something. I need to convince myself that I wasn't. I was running toward something...the life I wanted. The life where I didn't spend more time on public transit than I did with my kids. I know it sounds cliché, but the time they are little is so short, I didn't want to miss it.
The great thing, is that Shawn's school is only 15 minutes from our house. With him working, instead of me, we get 3 more hours of family time per day. I know he will miss being home, and the kids will miss him tremendously. He is such an amazing parent, and our kids have been so fortunate to have the time with him at home.
I'm thrilled about this next chapter for our family. I have lots of plans and I promise to fill you in on them soon.


So, Happy New Year to you, whether you're a parent with a child going back to school, or a teacher with a new class, or a person who loves the change of season and the promise of something new. The summer is officially over, and with September comes cool nights, changing leaves, apples and pumpkins...some of my most favourite things! Wishing you all a year that is filled with new adventures...especially the kind that sneak up on you. Here's to Plan B!

Happy New Year! ... by Barbara (Ruth)

Yes, I am aware it is not January. And no, the title of this blog is not a mistake.

I'm invigorated as I write this - I just came back from a walk to the park with a friend and her wonderful girls. The air was brisk, the leaves were flying (according to the almost-three-year-old), and there was a certain energy in the air.

After the park we celebrated the end of summer with a last ice cream of the season at Ed's here in the Beach (a fond farewell to burnt marshmallow until next season), and talked about our plans for the fall. I started to get so excited just thinking about it - my favourite season of the year and all the fun it promises!

My sisters Joan and Janet set for school, circa 1964. This
was before "packing purses" started, but you can be sure
Janet packed that bookbag with great care.
This love of the fall season is a family tradition actually. The night before Labour Day was very exciting in our house - we had to decide what to wear for the first day of school (in those days, that was a big occasion and we dressed up! Mind you, those were also the days when you dressed up to go on a plane.), get out our new lunchboxes and pencil cases and book bags, and, most importantly, "pack our purses". Oh yes. The four sisters made a big deal of packing our purses with all the things we might need at school.

For me, fall is when everything returns to normal after a summer of feeling completely enervated (GW) by the heat and humidity. I'm no longer trapped inside the air conditioning, and can leave doors and windows open, and go for big long walks. I start baking again in the fall. Even work gets better with people back and revived after their holidays - you can actually get things done again because everyone is in the office for a change! And of course fall is all about apples and football and cute jackets with colourful scarves and clear skies and colourful leaves and cozy nights.

My Mum and I actually dubbed September first as our New Year's celebration about ten years ago. We were sitting on the dock up at the cottage after a really nice summer, and we were actually looking forward to getting back to the city. Our guests had all left, and it was a little forlorn up there, and we started talking about our plans for the fall and getting excited about it. We decided that much more than January first, September first felt like a time of New Beginnings and anticipation, and that has stuck with us ever since!

I have so much to look forward to this fall - a long weekend in Chicago, a basement renovation, and a trip to Maui, to name a few. And of course I'm excited that, like the new fall season on TV, you can all look forward once again to regular postings on The Musings of Barbara Jean!

And so now I'm off to pack my purse for tomorrow. It may not be the first day of school for me, but that's no excuse for being off-season. :)

Happy New Year to you all!